Category: Patterns

  • Princess Cut Bandana Pattern +diamond motif free pattern

    Princess Cut Bandana Pattern +diamond motif free pattern

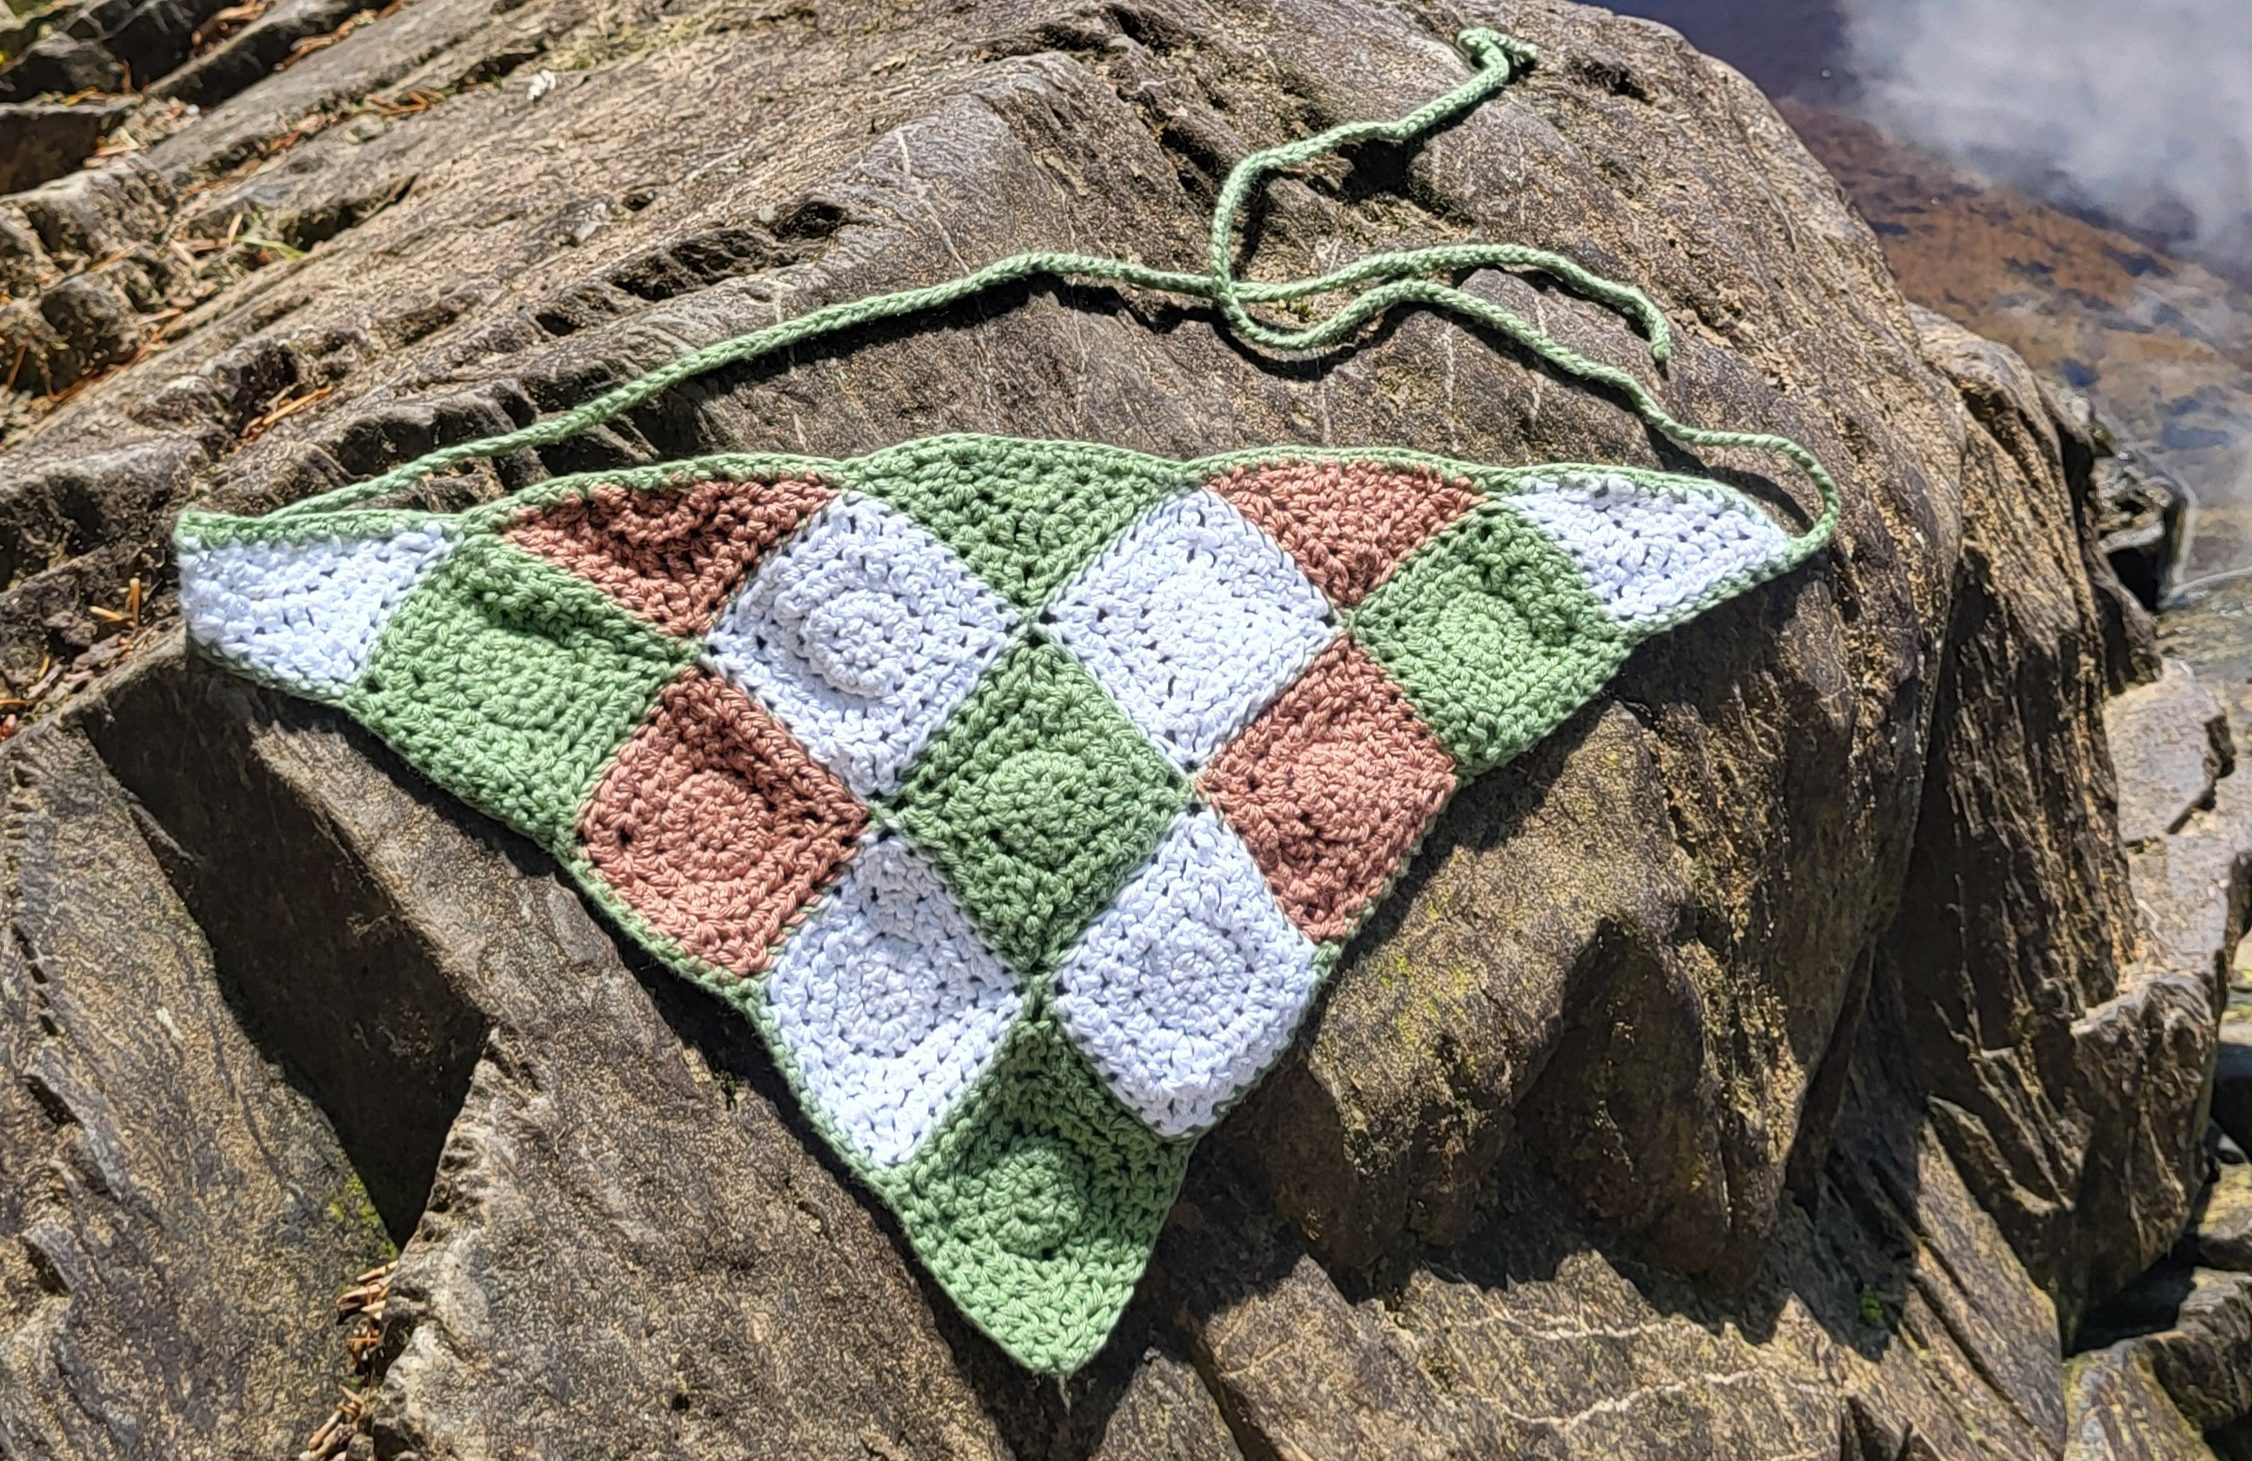
    The crocheted Princess Cut Bandana in green, white, and brown diamond pattern laid flat on a rock.

    The Princess Cut Bandana is a diamond-motif crochet bandana pattern that is customizable and fun to wear. Built with small lozenges, made with only 4 rows, it’s a project that works up quickly, especially if you like sewing pieces together. If you’re looking for a hair accessory for the beach and everyday outfits or a handmade gift, this intermediate pattern delivers stunning results, and includes a planning tool so you know exactly what to crochet.

    If you love play with colours and patterns before you start your project you will love the Canva template that comes with the PDF.

    I created the lozenges motifs last year for a crochet top, that I’m still keeping it secret shhh, but I wasn’t sure how to approach writing the pattern yet. When I reached out to other crocheters, one suggested starting with something simpler, like a bandana. And so the Princess Cut Bandana was born!

    It is the first bandana I’ve ever worn, I didn’t think I was a “bandana girl”, but it turns out I really liked it. I’m a bandana girl sometimes now. Those days your hair is starting to look a bit oily but you’re not ready to wash it… perfect bandana day.

    Why You’ll Love This Bandana

    • Small motifs that are quick and satisfying to crochet
    • You can use any yarn from your stash
    • Canva template to plan your bandana
    • A handmade accessory that’s fun to wear or gift

    Even if you’re not a huge fan of sewing pieces together like me, it’s a small project to get it over with.

    Princess Cut Bandana Pattern Materials List

    • Yarn of your choice*
    • Crochet hook compatible with yarn**
    • Tapestry needle
    • Scissors

    *Small bandanas used 30gr of weight 1 yarn. 35gr when using weight 3. 80gr in total when using weight 4 yarn. Based on testers feedback.

    **I used a size 4mm on weight 1 yarn. I recommend going up at least half a size recommended on the yarn label

    Free Lozenge Crochet Motif Instructions

    Here’s the lozenge motif that builds the Princess Cut Bandana. You can use this to make your own version for free, or grab the full PDF if you’d like the colour planner and an ad‑free experience.

    Full Lozenge

    1. 8sc in MR, sl in the first stitch. (8)
    2. 2hdc in every stitch (8 inc), sl on the first stitch. (16)
    3. Chain 1, *hdc, hdc and a dc in the same stitch (inc), tc, dc and hdc in same stitch (inc), hdc, 2hdc in the same stitch (inc), dc, 2hdc in same stitch (inc)* repeat between the *, sl in the first stitch. (24)
    4. Chain 1, * hdc in the next 2 stitches, hdc and a dc in the same stitch (inc), tc, dc and hdc in the same stitch (inc), hdc in the next 3 stitches, 2 hdc in the same stitch (inc), dc, 2 hdc in the same stitch (inc), hdc* repeat between the * sl in the first stitch. (32)
    5. Fasten off and tighten the MR.

    Half Lozenge

    1. 5sc in MR, ch 1 and turn your work. (5)
    2. 2hdc in the same stitch(inc) twice, hdc, 2hdc in the same stitch (inc) twice, chain 2 and turn your work. (9)
    3. Dc, 2hdc in the same stitch (inc), hdc, hdc and dc in the same stitch (inc), tc, dc and hdc in the same stitch (inc), hdc, 2hdc in the same stitch (inc), dc, ch 2 and turn your work. (13)
    4. Dc, 2hdc in the same stitch (inc), hdc in the next 3 stitches, hdc and dc in the same stitch (inc), tc, dc and hdc in the same stitch (inc), hdc in the next 3 stitches, 2hdc in the same stitch (inc) dc. (17)
    5. Fasten off.
    The crocheted Princess Cut Bandana in green, white, and brown diamond pattern laid flat on a rock.

    With these two you can make the bandana yourself. But if you need more details and pictures to make your own you can get the full pdf version. There you’ll get the best thing about this pattern. The Canva template where you can try all the combinations your heart desires, so when you start crocheting you know exactly how many motifs to make and where they are going.

    You can play with endless combinations before you even start crocheting. It’s like having a digital sketchbook for your project. In there you will find two options for sizes, a small and a large.

    But if you prefer pen and paper, there’s colouring pages you can print and plan your bandana old s

    Get Your Copy Now!

    Click below to grab your pattern and start start stitching your Princess Cut Bandana today:

    How the Testers Made It Their Own

    Make your bandana in your favourite yarn and colours, and watch it become one of those handmade pieces you’ll be proud to wear. When you finish, share your photos with #PrincessCutBandana and tag me, I’ll love to see it.

    Thank you for supporting my crochet designs. I hope you love making it as much as I loved it.

  • Make the Perfect Spring-Summer Crochet Top | Introducing The Tea Top |

    Make the Perfect Spring-Summer Crochet Top | Introducing The Tea Top |

    Tea Top crochet pattern sample in colourful ripple stripes with three quarter sleeves, worn outdoors with a blue skirt, showing fit and drape

    Let me introduce you to my latest design, the Tea Top. It is a modern, made to measure crochet top built from two simple T shaped panels and a soothing ripple stitch. I designed it with versatility in mind, so you can choose any sleeve length you like, from short sleeves to three quarter, long, or something perfectly in between. It is light, comfortable, great for experimenting with colour, and works with any yarn weight, which makes it an easy and wearable project for spring and summer. The kind of crochet you actually want to wear anywhere

    If you love crochet pieces that fit your body and your style, the Tea Top is going to be such a fun make.

    Why I Designed the Tea Top

    I first had the idea for the Tea Top back in 2022, when a ripple stitch blanket popped up on my feed and the voices in my head screamed ‘we have a top for you. They were loud, and the idea was fully formed, so I had to follow it.

    I wanted something for my own wardrobe, something simple and wearable, so I gathered the yarn I had bought for a dress that didn’t quite work out and started crocheting.

    I didn’t begin with a full plan. I did my gauge, made a little sketch in my head, restarted twice (as usual), and slowly the first version came together. The 3/4 sleeve version was the original one, and fun fact: I only realised one of my panels had an extra repeat when I was putting them together. So I hoped for the best and just kept going and even sewed the panels with my brand‑new sewing machine, which felt very exciting at the time (and yes, it does work, and yes I did feel lazy).

    That top ended up becoming one of my most‑worn pieces. I wore it out, to work, in spring, in summer, with skirts, jeans, and fancier trousers. It was the kind of make that quietly slips into your wardrobe and stays.

    It took me three years to finally sit down and write the pattern, and by then I knew it would be a very versatile design. The second time around, I leaned into a more relaxed T‑shirt look instead of the fitted “look at my sleeves” vibe of the first version. Also wanted to make sure that one extra repeat was not a must, and it does still work without it.

    Seeing my testers working with different yarns was such a surprise, it transforms so easily, and I’m convinced it could even work for winter with the right fibre.

    One of my favourite things about this pattern is how soothing the stitch repeat is. Once you get the rhythm, it flows by. The increases and decreases are easy to spot, so you don’t need to keep count, and there isn’t much sewing to do on the sleeves. It’s the kind of project you can pick up in the evening and just enjoy while watching tv.

    More than anything, I wanted this to be a relaxed and creative make. A pattern you can play with: colours, length, sleeve style, fit. Shape into something that feels like you. Long or cropped, short sleeve or long, loose or fitted. The Tea Top adapts to your style, your season, your wardrobe.

    Why You’ll Love This Crochet Top

    • A soothing ripple stitch that’s relaxing and easy to follow
    • Simple, approachable construction
    • Made to measure, so the fit is exactly how you like it
    • Easy to customise (colours, length, sleeves, fit)
    • Works beautifully with different fibres and seasons
    • A wearable, everyday crochet piece that you can wear anywhere

    If you’re looking for a piece that you can make your own, that works across seasons, and that you’ll reach for again and again, this is the one. I’m so excited to share it with you, and I hope it becomes a favourite in your handmade collection.

    Tea Top Crochet Pattern Materials List

    • Yarn of your choice
    • Crochet hook compatible with yarn
    • Tapestry needle
    • Scissors
    • Measuring tape
    • Stitch markers (optional)

    Because the Tea Top is made to measure and can be customised in so many ways (length, sleeves, fit, yarn weight), I’m not providing specific yardage estimates. The amount of yarn you’ll need depends entirely on the choices you make for your version. This is a great project to use what you already have in your stash, mix colours, combine leftovers, or finally use that yarn you’ve been saving. I used under 280 g for each top when working with Hobbii 8/4 cotton, both can be considered a size S.

    How the Testers Made It Their Own

    • Tea Top crochet pattern sample in multicolour ripple stripes with short sleeves and scalloped hem, worn by maker indoors with a straw hat
    • Tea Top crochet pattern in dark rainbow ripple stripes with long sleeves, worn indoors in a softly lit room.
    • “Tea Top crochet pattern in pastel ripple stripes with short sleeves, worn outdoors in front of a tree and house on a sunny day
    • “Tea Top crochet pattern in bold ripple stripes of red, white, navy, light blue and grey, with long sleeves featuring open wave details, worn indoors against a plain wall.
    • Tea Top crochet pattern in pink and dark grey ripple stripes with long sleeves, worn outdoors on a sunny day in a grassy area with trees and a parked car in the background.
    • Tea Top crochet pattern in blue and teal ripple stripes with short sleeves, worn indoors in a bedroom with a blue‑and‑grey quilt in the background.
    • “Tea Top crochet pattern in bright rainbow ripple stripes with long sleeves and open‑shoulder loop details, worn outdoors in a grassy yard with trees and houses in the background.
    • Tea Top crochet pattern in a bolero variation, worked in brown, black and white ripple stripes with long sleeves, worn outdoors on a wooden deck with trees in the background.
    • Tea Top crochet pattern in pastel ripple stripes with long sleeves featuring open lattice details, shown against a solid green background.
    • Tea Top crochet pattern in bright rainbow ripple stripes with short sleeves, worn outdoors on a sunny day in a grassy area with trees in the background.
    • Tea Top crochet pattern in bright multicolour ripple stripes with long sleeves, worn outdoors beside a body of water with greenery in the background.
    • “Tea Top crochet pattern in bright multicolour ripple stripes with short sleeves and open‑shoulder loop details, worn outdoors on a grassy area with trees in the background.

    Get Your Copy Now!

    Click below to grab your pattern and start start stitching your TeaTop today:

    Make your Tea Top in your favourite yarn, your perfect fit, and your ideal length and watch it become one of those pieces you reach for without thinking. When you finish, share your photos with #TeaTop. I can’t wait to see your colours, your sleeves, your style.

    Thank you for supporting my crochet designs. Creating the Tea Top has been such a joy, and I hope you love making it as much as I loved bringing it to life.

    How will you style your Tea Top this season? Tell me in the comments below.

  • Introducing the Cari Top | Reversible Crochet Top Pattern

    Introducing the Cari Top | Reversible Crochet Top Pattern

    I’m excited to share my second summer crochet pattern: the Cari Top! This reversible crochet top pattern brings playful style to easy-making. Two identical panels join in a breezy linen-stitch crochet fabric, while double-chain cord straps add an unexpected twist. I kept the silhouette clean and simple, but of course I got carried away with the loops—creating straps that truly steal the show. Quick to work up, fully reversible, and perfect for warm-weather days, the Cari Top is ready to become your go-to summer staple.

    Note: This pattern actually released months ago, and yes, this post is seriously overdue. I was off traveling and completely absorbed in designing The View Dress. But better late than never, right? I’m thrilled to finally have a dedicated post for the Cari Top.

    Inspired by a leotard I received from a friend, I set out to create a wardrobe staple with something special built right in. The textured linen stitch makes the fabric breathable and soft, perfect for warm days spent outdoors or at the beach. Whether you choose two contrasting hues for a fully reversible look or stick to one color for a sleek monochrome effect, the Cari Top adapts to your style.

    Why You’ll Love the Cari Top

    • Simple two-panel construction makes this pattern relaxing and quick to work up
    • Double chain cord straps add a unique, playful detail
    • Reversible design lets you switch looks in an instant
    • Textured linen stitch creates a soft, breathable fabric for hot weather
    • Inclusive sizing from XS to 5X

    Love crochet but want a modern twist? The Cari Top nails it. The linen stitch looks just like knitting, and the half-double crochet foundation flares the bottom just enough to hug your hips and show off your waist

    Cari Top Materials List

    Yarn

    • Yarn Weight: Super fine / Fingering in Color A and B
    • Color A:

    Yardage per size (based on 50 g skeins = 185.91 yds):
    XS: 706 yds (4 skeins)
    S: 818 yds (5 skeins)
    M: 931 yds (5 skeins)
    L: 1062 yds (6 skeins)
    XL: 1174 yds (7 skeins)
    2X: 1300 yds (7 skeins)
    3X: 1392 yds (8 skeins)
    4X: 1559 yds (9 skeins)
    5X: 1672 yds (9 skeins)

    • Color B: only requires 1 skein for accent details

    Hook

    • Hook sizes: 3 mm for panels; 4 mm for straps

    Notions

    • tapestry needle
    • scissors
    • tape measure

    Gauge

    30 stitches and 30 rows = 4 inches (10 cm) in Linen Stitch, worked with the 3 mm hook.
    Be sure to swatch before you begin. if your fabric comes out tighter, try a slightly larger hook; if it’s too loose, drop down a size. Getting this gauge right means your Cari Top will fit just as you expect, with no last-minute surprises!

    Get Your Copy Now!

    Click below to grab your pattern and start start stitching your CariTop today:

    Grab your Cari Top pattern on your favorite platform and start stitching your new summer essential today.

    When you finish, share your photos with #Caritop. I can’t wait to see which color combinations you choose!

    Thank you for supporting my crochet ideas. Creating the Cari Top was a joy, and I hope you love making it as much as I did.

    How will you style your Cari Top? Tell me in the comments below, I’d love to hear your ideas!

  • The View Dress | Free Crochet Pattern | Series Hub

    The View Dress | Free Crochet Pattern | Series Hub

    The View Dress is a bold, made-to-measure crochet piece with a dramatic cowl neckline at the back and a silhouette that’s shaped to your body. It’s designed to be flexible, use any yarn weight and compatible hook, and let the fabric reflect your style. Whether you want something breezy and drapey or structured and cozy, this pattern adapts to you.

    I stitched mine in black bamboo yarn with a 2.5 mm hook, from Colombia to Brazil, and documented every step. The result? A five-part blog series that walks you through the entire process, from swatching and shaping to straps, neckline, and final tweaks.
    This pattern is free, customizable, and designed to travel with you, whether that’s across a continent or just to your favorite chair.

    Materials & Sizing

    • Yarn: Black bamboo, fingering weight (I used around 8 balls of yarn for a size XS)
    • Hook: 2.5 mm
    • Sizing: Custom-fit based on your own measurements
    • Notions: Stitch markers, elastic thread, hooks & eyes

    If you’re crazy like me use the same yarn as me. But you can absolutely choose any yarn weight and compatible hook. This is a made to measure pattern, so it adapts to your body and your style.

    The 5-Part Series

    1. Part 1: The Start of The View Dress
    Written from a plane over the Amazon. I introduce the project, the yarn, and the plan to crochet a dress while traveling. Includes swatching, early design thoughts, and why I refused to quit this time.

    2. Part 2: Skirt’s Front Panel
    From Bogotá to Cartagena, I explain how to shape the front skirt panel with custom measurements and stitch math. Includes tips on gauge, increases, and how to calculate your own fit.

    3. Part 3: Skirt’s Back Panel
    Written from Nazca, Peru. This post covers dart placement and shaping for the back panel, with extra increases to fit your curves. Plus: row-tracking tips and travel updates.

    4. Part 4: The Top Portion
    From bust shaping to strap construction, I walk through the top half of the dress. Includes neckline finishing, closure ideas, and a few stories from the Andes and beyond.

    5. Part 5: Mistakes I Made and How to Fix Them
    Final tweaks for fit and silhouette, because frogging was not an option. Learn how I adjusted the cowl neckline and side flare with elastic thread. Plus: blocking tips and final thoughts on the finished piece.

    Share Your View

    Whether you’re crocheting on a mountaintop, a city balcony, or your favorite cafe, I’d love to see your version.
    Tag me @_angemade and use #CrochetingWithAView so I can cheer you on and share your moment.

    Transparency Note

    This pattern hasn’t been formally tested by others yet. Just me, crocheting across South America with a lot of improvisation and stubbornness. I’ve updated the posts with fixes and tips as I went, and I’m here to help if you run into anything unexpected. Once the pattern is officially tested, I’ll update it accordingly.

    Handmade is always a little experimental, and that’s part of the magic.