Category: Free Patterns

  • Princess Cut Bandana Pattern +diamond motif free pattern

    Princess Cut Bandana Pattern +diamond motif free pattern

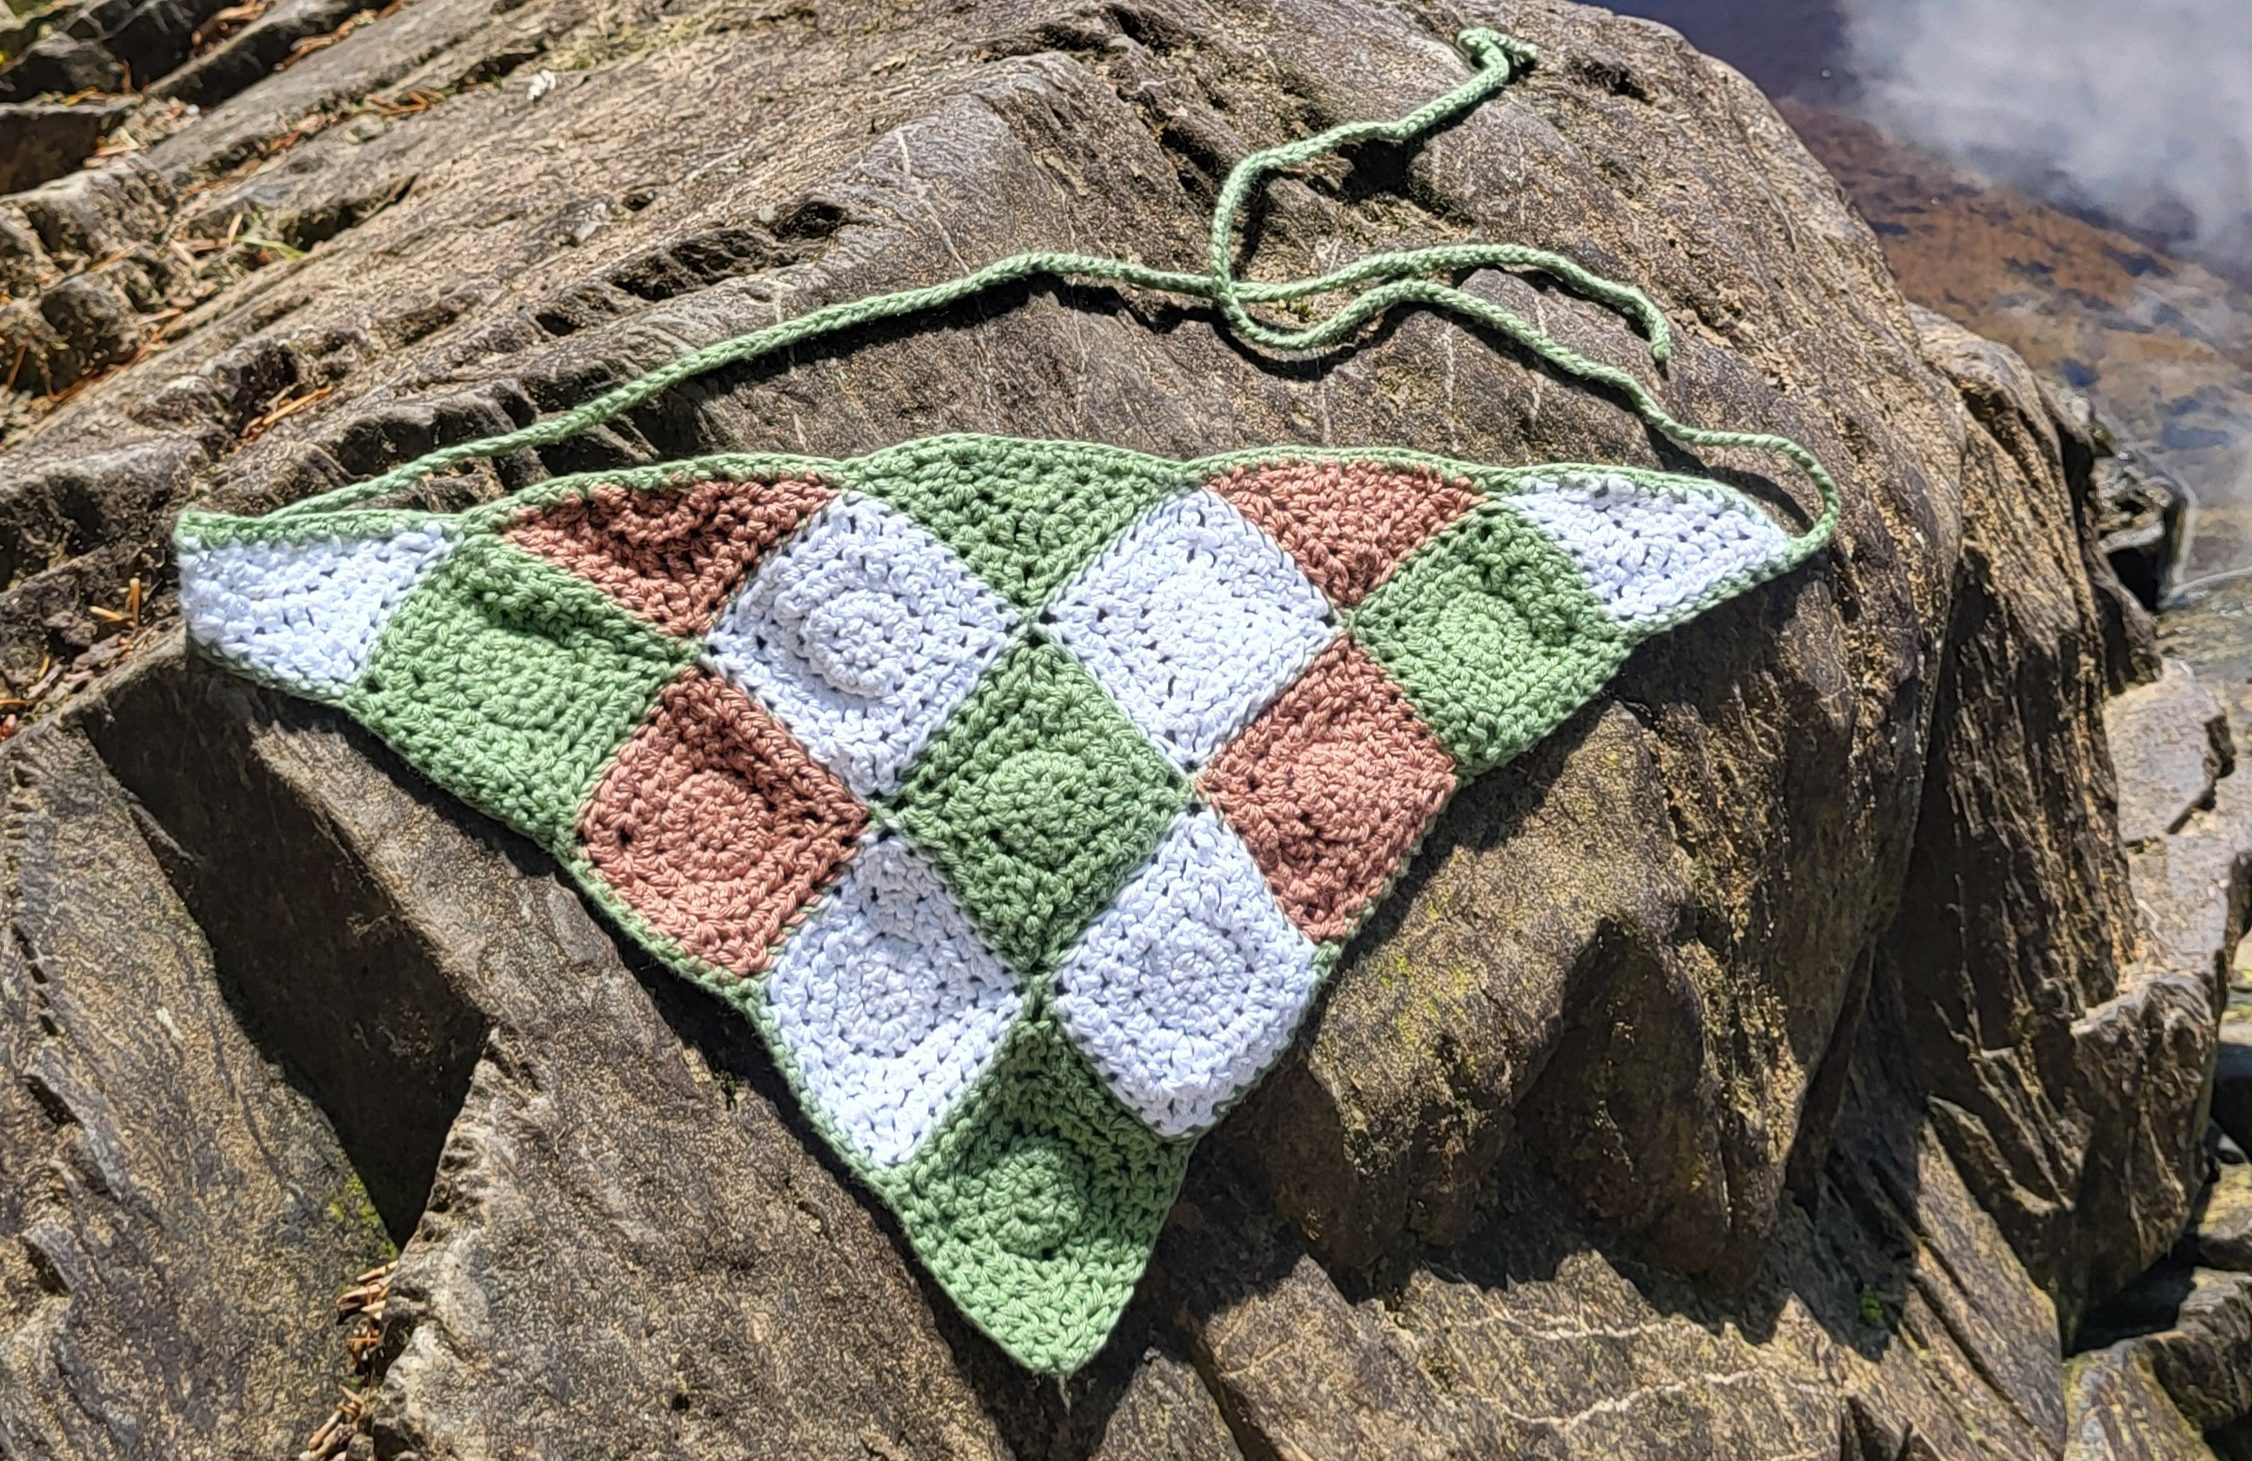
    The crocheted Princess Cut Bandana in green, white, and brown diamond pattern laid flat on a rock.

    The Princess Cut Bandana is a diamond-motif crochet bandana pattern that is customizable and fun to wear. Built with small lozenges, made with only 4 rows, it’s a project that works up quickly, especially if you like sewing pieces together. If you’re looking for a hair accessory for the beach and everyday outfits or a handmade gift, this intermediate pattern delivers stunning results, and includes a planning tool so you know exactly what to crochet.

    If you love play with colours and patterns before you start your project you will love the Canva template that comes with the PDF.

    I created the lozenges motifs last year for a crochet top, that I’m still keeping it secret shhh, but I wasn’t sure how to approach writing the pattern yet. When I reached out to other crocheters, one suggested starting with something simpler, like a bandana. And so the Princess Cut Bandana was born!

    It is the first bandana I’ve ever worn, I didn’t think I was a “bandana girl”, but it turns out I really liked it. I’m a bandana girl sometimes now. Those days your hair is starting to look a bit oily but you’re not ready to wash it… perfect bandana day.

    Why You’ll Love This Bandana

    • Small motifs that are quick and satisfying to crochet
    • You can use any yarn from your stash
    • Canva template to plan your bandana
    • A handmade accessory that’s fun to wear or gift

    Even if you’re not a huge fan of sewing pieces together like me, it’s a small project to get it over with.

    Princess Cut Bandana Pattern Materials List

    • Yarn of your choice*
    • Crochet hook compatible with yarn**
    • Tapestry needle
    • Scissors

    *Small bandanas used 30gr of weight 1 yarn. 35gr when using weight 3. 80gr in total when using weight 4 yarn. Based on testers feedback.

    **I used a size 4mm on weight 1 yarn. I recommend going up at least half a size recommended on the yarn label

    Free Lozenge Crochet Motif Instructions

    Here’s the lozenge motif that builds the Princess Cut Bandana. You can use this to make your own version for free, or grab the full PDF if you’d like the colour planner and an ad‑free experience.

    Full Lozenge

    1. 8sc in MR, sl in the first stitch. (8)
    2. 2hdc in every stitch (8 inc), sl on the first stitch. (16)
    3. Chain 1, *hdc, hdc and a dc in the same stitch (inc), tc, dc and hdc in same stitch (inc), hdc, 2hdc in the same stitch (inc), dc, 2hdc in same stitch (inc)* repeat between the *, sl in the first stitch. (24)
    4. Chain 1, * hdc in the next 2 stitches, hdc and a dc in the same stitch (inc), tc, dc and hdc in the same stitch (inc), hdc in the next 3 stitches, 2 hdc in the same stitch (inc), dc, 2 hdc in the same stitch (inc), hdc* repeat between the * sl in the first stitch. (32)
    5. Fasten off and tighten the MR.

    Half Lozenge

    1. 5sc in MR, ch 1 and turn your work. (5)
    2. 2hdc in the same stitch(inc) twice, hdc, 2hdc in the same stitch (inc) twice, chain 2 and turn your work. (9)
    3. Dc, 2hdc in the same stitch (inc), hdc, hdc and dc in the same stitch (inc), tc, dc and hdc in the same stitch (inc), hdc, 2hdc in the same stitch (inc), dc, ch 2 and turn your work. (13)
    4. Dc, 2hdc in the same stitch (inc), hdc in the next 3 stitches, hdc and dc in the same stitch (inc), tc, dc and hdc in the same stitch (inc), hdc in the next 3 stitches, 2hdc in the same stitch (inc) dc. (17)
    5. Fasten off.
    The crocheted Princess Cut Bandana in green, white, and brown diamond pattern laid flat on a rock.

    With these two you can make the bandana yourself. But if you need more details and pictures to make your own you can get the full pdf version. There you’ll get the best thing about this pattern. The Canva template where you can try all the combinations your heart desires, so when you start crocheting you know exactly how many motifs to make and where they are going.

    You can play with endless combinations before you even start crocheting. It’s like having a digital sketchbook for your project. In there you will find two options for sizes, a small and a large.

    But if you prefer pen and paper, there’s colouring pages you can print and plan your bandana old s

    Get Your Copy Now!

    Click below to grab your pattern and start start stitching your Princess Cut Bandana today:

    How the Testers Made It Their Own

    Make your bandana in your favourite yarn and colours, and watch it become one of those handmade pieces you’ll be proud to wear. When you finish, share your photos with #PrincessCutBandana and tag me, I’ll love to see it.

    Thank you for supporting my crochet designs. I hope you love making it as much as I loved it.

  • The View Dress | Free Crochet Pattern | Series Hub

    The View Dress | Free Crochet Pattern | Series Hub

    The View Dress is a bold, made-to-measure crochet piece with a dramatic cowl neckline at the back and a silhouette that’s shaped to your body. It’s designed to be flexible, use any yarn weight and compatible hook, and let the fabric reflect your style. Whether you want something breezy and drapey or structured and cozy, this pattern adapts to you.

    I stitched mine in black bamboo yarn with a 2.5 mm hook, from Colombia to Brazil, and documented every step. The result? A five-part blog series that walks you through the entire process, from swatching and shaping to straps, neckline, and final tweaks.
    This pattern is free, customizable, and designed to travel with you, whether that’s across a continent or just to your favorite chair.

    Materials & Sizing

    • Yarn: Black bamboo, fingering weight (I used around 8 balls of yarn for a size XS)
    • Hook: 2.5 mm
    • Sizing: Custom-fit based on your own measurements
    • Notions: Stitch markers, elastic thread, hooks & eyes

    If you’re crazy like me use the same yarn as me. But you can absolutely choose any yarn weight and compatible hook. This is a made to measure pattern, so it adapts to your body and your style.

    The 5-Part Series

    1. Part 1: The Start of The View Dress
    Written from a plane over the Amazon. I introduce the project, the yarn, and the plan to crochet a dress while traveling. Includes swatching, early design thoughts, and why I refused to quit this time.

    2. Part 2: Skirt’s Front Panel
    From Bogotá to Cartagena, I explain how to shape the front skirt panel with custom measurements and stitch math. Includes tips on gauge, increases, and how to calculate your own fit.

    3. Part 3: Skirt’s Back Panel
    Written from Nazca, Peru. This post covers dart placement and shaping for the back panel, with extra increases to fit your curves. Plus: row-tracking tips and travel updates.

    4. Part 4: The Top Portion
    From bust shaping to strap construction, I walk through the top half of the dress. Includes neckline finishing, closure ideas, and a few stories from the Andes and beyond.

    5. Part 5: Mistakes I Made and How to Fix Them
    Final tweaks for fit and silhouette, because frogging was not an option. Learn how I adjusted the cowl neckline and side flare with elastic thread. Plus: blocking tips and final thoughts on the finished piece.

    Share Your View

    Whether you’re crocheting on a mountaintop, a city balcony, or your favorite cafe, I’d love to see your version.
    Tag me @_angemade and use #CrochetingWithAView so I can cheer you on and share your moment.

    Transparency Note

    This pattern hasn’t been formally tested by others yet. Just me, crocheting across South America with a lot of improvisation and stubbornness. I’ve updated the posts with fixes and tips as I went, and I’m here to help if you run into anything unexpected. Once the pattern is officially tested, I’ll update it accordingly.

    Handmade is always a little experimental, and that’s part of the magic.

  • Crocheting on Two Wheels (Part 4): The Top Portion

    Crocheting on Two Wheels (Part 4): The Top Portion

    Last time I wrote from Nasca, Peru. Now I’m back home, and this post is long overdue. (And yes, I didn’t take proper notes and now I’m paying the price.) After we arrived, took some rest, visited family, and explored a few places nearby, I definitely lost a bit of momentum.

    The good news? I did complete my goal of finishing the dress before reaching Brazil, literally the night before. And let’s be honest: weaving in the ends is just the price we pay to be worthy of wearing a handmade piece. The dress is done when you make the last stitch, not when you weave the last end.

    Finishing the Back Panel

    The back panel was completed two days after we crossed the border between Peru and Chile. I tried hard to finish it in Peru, even picked up speed, but no luck.

    Since Nasca, our trip highlights included climbing 4,000 meters in a single day (we felt that), seeing the Andes, and spotting a dog in a helmet on a motorcycle. We visited Cusco with its impressive stone walls at the Sun Temple. We skipped Machu Picchu this time to stay on budget, but we’ll be back one day with better planning.

    We spent two days by Lake Titicaca, saw a geyser on the way out of Peru, and passed by the Atacama Giant in Chile, along with other geoglyphs. I finally tried crocheting on the bike after realizing I’m not a desert person, it’s beautiful for the first few hours, then it gets repetitive. That helped me finish the dress on time.

    We didn’t linger in Chile, maybe four days total, then moved on to Argentina. We didn’t have specific sights to see, just wanted to get home. But we did pass through the Argentinian Chaco, with its long, straight roads, also great for crocheting on the bike.

    Let’s Talk Dress Construction

    For this portion, you’ll need the following measurements:

    • A – Half bust circumference
    • B – Waist to nipple
    • C – Nipple to collarbone
    • D – Neck circumference

    With the back panel done, I returned to the front panel to crochet the top portion. The plan is to crochet upward from the bust.

    To begin, take your bust circumference, divide it in half, and subtract 2–3 cm for negative ease. I was lucky, this measurement matched the width I started my skirt with, so I didn’t need to increase stitches between hip and chest. If you do, increase gradually (like we did before for the skirt) until you reach measurement B.

    In my case:

    • Measurement A = 118 stitches
    • To reach measurement B, I needed 36 rows
    • After that, I began decreasing every other row until I reached measurement C in length, I needed 48 rows. With 24 decreases.

    Building the Straps

    Once the bust decreases were done, don’t cut the yarn. We’ll continue with the first strap.

    Place the top in front of your chest and decide how much fabric you want for the neck portion. What’s left will become the straps. Make sure it’s centered, leave the odd number of stitches in the middle.

    I had 66 stitches after the bust decreases. My straps were 8 stitches wide, which left 50 stitches for the neck portion. I added a 1-stitch gap between the straps and neck, so the neck ended up with 48 stitches connected to the dress.

    To make the straps:

    1. Crochet half double crochets until the strap is long enough
    2. Connect it to the dress where the decreases begin
    3. I sewed mine by single crocheting the last row of the strap with the side of the top
    4. Make them tighter than you think, they’ll stretch over time

    Repeat the same number of rows for the second strap, this time attaching the yarn on the other side. I recommend trying it on before cutting the yarn on both straps, so you can adjust if needed.

    Finishing the Neckline

    To finish the neckline, calculate how many stitches you need for measurement D (neck circumference). You already have some stitches on the dress, add the rest on both sides.

    In my case:

    • Needed: 76 stitches
    • Had: 48 stitches
    • Added: 14 stitches on each side

    To do this:

    1. Chain 14, connect with half double crochets across the top
    2. Chain another 16, turn, and place half double crochets from the third chain to the end
    3. Continue adding rows until you reach about 3 cm (two fingers’ worth)

    For closure, I used hooks and eyes, sewed them on the corners and it worked well.

    I should add a third hook and eye in the middle, but oh well…

    Final Touches

    Once the panels are complete, sew them together carefully, keeping the edges aligned. The back of the skirt will forms a cowl neck effect. To keep those folds in place, I recommend sewing them down gently, this part may take a bit of experimentation, so play around until you’re happy with the result.

    photo sewed folds

    Please forgive the cats hair

    As a final optional detail, I added a thin cord at the back to accentuate the waist:

    1. I placed 3 half double crochets on the side of the piece, where the back panel ends and the top portion begins (photo)
    2. Crocheted a cord long enough to reach the opposite side
    3. Sewed a hook on one end of the cord and an eye on the other side of the dress
    Yes, this is after I fixed it.

    Final Thoughts

    I definitely regret not writing this sooner, it would’ve been easier with the details fresh in my mind. But the dress is done now. As usual, it didn’t turn out perfect, but it’s good enough that I’ll just need to fix a few things.

    Don’t worry, I’ll document those fixes in another post and go back to update the earlier ones with tips to avoid the same issues.

    Right now, I’m working on a top using the same approach. Just using a bunch of colourful leftover yarn. It will be fun to see how the same idea can be done slightly differently. If it behaves, you might see it in the future.

    If you’re making this dress, I’d love to see where your stitches take you. Whether it’s a quiet morning on the porch, a bustling café, or a view that makes your heart feel full—share your crochet moment. Tag me and use #CrochetingWithAView so we can celebrate the beauty of handmade, wherever you are.

  • Crocheting on Two Wheels (part 5) Mistakes I made and how to fix them

    I finally finished the dress, but if I said it was perfect on the first try I’d be lying. Even though this is my third attempt, and it’s the first version that actually covers everything it needs to. In this post I’m sharing the two small fixes I made, why they were needed, and how I corrected them.

    Back Cowl Neckline Too Low

    When I designed the cowl neckline at the back I left too much extra fabric. As a result the cowl hung lower than intended and made the back panel longer than the front. Part of the issue came from using my hipbone measurement instead of the waist measurement (see Part 2 of the series) to start the skirt. Simply adding some positive ease should be enough. Losing a bit of weight on the trip only made the problem worse.

    How I fixed it

    1. I measured how much fabric to remove from each side of the skirt panels.
    2. I resewed the panels together, tucking the excess fabric inside.
    3. when back and resewed the folds, with only one instead of two folds.

    The side of the dress had a loose fit

    The dress flared too much at the sides partly because it’s backless and partly because I made that section a bit too long. To bring the sides in I used elastic thread.

    How I fixed it

    1. I slipstitched with a black elastic thread along each side edge.
    2. The elastic holds the edges together while remaining flexible when I move.

    Final Fit and Feel

    After these tweaks I’m very happy with the finished dress. It fits my hips exactly as I imagined. The bamboo yarn feels light, soft, and drapey. It was tricky to work with at the start, but once I got used to the splitting the project flowed beautifully.

    Blocking

    I skipped blocking on this piece (do what I say not what I do), though bamboo yarn will stretch slightly. In my other projects I haven’t noticed major changes, but I’ll be careful when washing and blocking this one. I plan to reshape it as it dries so it holds the silhouette I want.

    Updates and What’s Next

    By the time this post goes live I will have updated the earlier posts so you can avoid these same mistakes. If you still run into trouble, that’s part of the handmade journey. We’ll fix it together instead of frogging the whole thing. This dress has too much baggage to be frogged.

    If you run into any trouble making your own version of this dress, don’t hesitate to reach out, I’m here to help. This pattern asks you to figure out a few steps on your own, but it’s much simpler than it first appears. Happy stitching!

    If you decide to make this dress, I’d love to see your version, especially if you’re crocheting with a view. Whether it’s a mountaintop, a city balcony, your favorite café, or just someone you love nearby, share your moment. Bonus points if it’s outside. Tag me and use #CrochetingWithAView so I can cheer you on and share the inspiration.

    Want to stay in the loop and never miss an update? Subscribe to my newsletter or follow me on Instagram @_angemade. Let’s keep crafting together!